Microsoft WORD is a powerful word processing program that gives a professional result. This tutorial will give you the basics on how to use MS WORD. Please note, that with all MS programs, there are many alternate ways on how to open and manipulate files.
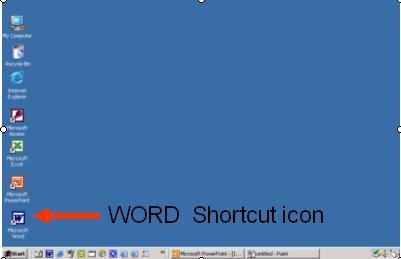
To Open MS Word - On the Desktop - Click on START, PROGRAMS, and select Microsoft WORD in the side menu To Start a NEW Docment - look at the gray toolbar below the dark blue border - click on FILE, SELECT NEW. A panel may or may not open on the right side, Select BLANK DOCUMENT from the menu by clicking on it.
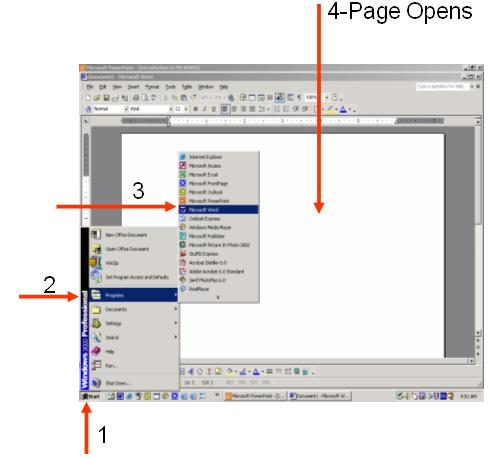
To Create a New Document - There are at least two ways to do this. You can also do the following: 1. Click on START, 2. PROGRAMS, and select 3.MICROSOFT WORD on the side menu, 4. A Page Opens. See image below:
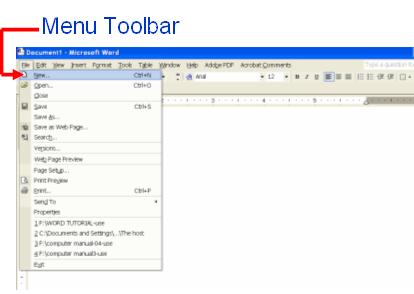
Another was is by clicking the gray Toolbar below the dark blue line border. Click on FILE, Select NEW. A clean page will open.
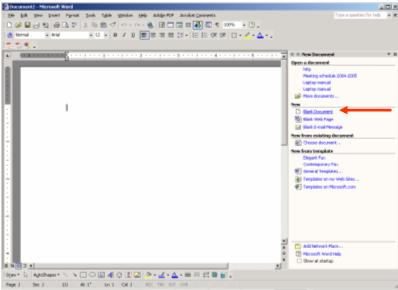
Note, there may be times when a right side panel will open with a blank page. If so, look for the words BLANK DOCUMENT and click on it. A new page will open. You can close the side panel by clicking on the X in its UPPER RIGHT.
To Open an Existing Document - To open a document you have already saved to a disk,
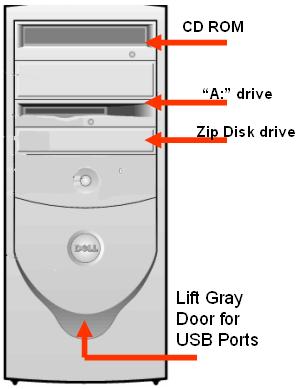
place the diskette into the appropriate a:/drive (found in the middle of the computer tower).
Go to the Tool bar and click either on File, Open OR Click on the yellow folder on the menu
toolbar ( )
)
A diaog box will open where you can select the drive your file is on. On the dropdown list - select A:/ -if you are using a small 3.5 diskette, Removeable Disk if you're using a Zip Disk. If you are using a flash drive - please open the gray door and place the flash drive into one of the USB ports. Select "Save to Removeable Disk" to save. and you should see the document you want to open. Double click on the document to open.
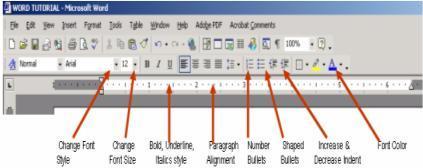
To Format a Document - Highlight the text you would like to format by holding down the mouse and drag it across the word(s) you want to format. Click on the appropriate button to get the desire effect.
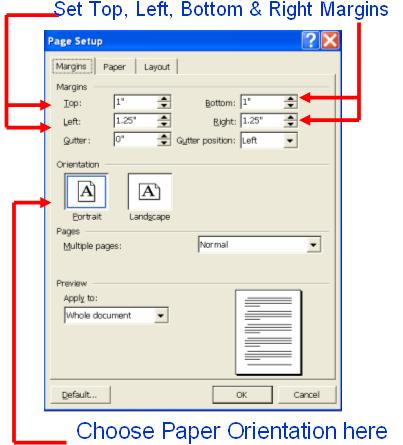
To Set Margins - To set of change page margins, go the File, click on PAGE SETUP and then click the MARGINS tab. You can keep the default margins or change margins by clicking on the up or down arrows next to the margin indicator. You can also choose portrait or landscape paper orientations here as well.
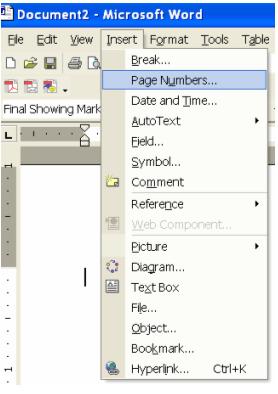
To Insert Page Numbers/Date/Time - Click INSERT on the menu tool bar and Select PAGE NUMBERS. Select where you would like the page numbers to appear. You can repeat the process and select DATE and TIME if needed for your document.
To Use Spell Check - Click on TOOLS on the menu toolbar and click on SPELLING AND GRAMMAR. Suggestions will come up in a dialog box. If you want to make the suggested change, click CHANGE on the box. If you don't want to make a change, click on IGNORE RULE.

To Use Synonyms - If you would like to change a word that has the same meaning as the original, you can use the SYNONYM tool. Highlight the word you would like to change and, using the RIGHT MOUSE BUTTON a submenu will come up. Click on the word synonym, and a list of suggestions will come up. If you find a word you would like to use - click on it and it replace the old word.
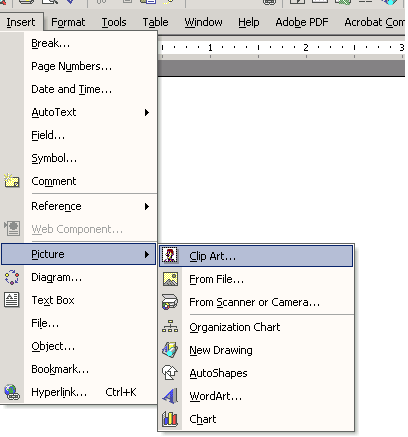
To Insert a Picture - Graphics can be added to your document by going to the menu toolbar and select INSERT, then PICTURE. You can select images from Clip Art or a saved File. Click once where you want the image to go in your document. To insert an image from a saved file from a diskette - use the same procedure as opening an existing WORD document. To insert Clip Art, click on INSERT, PICTURE, CLIP ART. On the side you should see a long dialogue box where you can choose the clip art you want. Type in the category you want (i.e., Books) and click the SEARCH button. RIGHT CLICK your selection and click on INSERT.
Save to a Diskette
If you want to access information for later use, you must save your data onto a diskette.
If you do not have a diskette, you will need to purchase one.
Place a PC formatted diskette into the A:/drive.
Use the procedure below for the FIRST TIME you save your data.
To save data again, just click on the DISK icon
( )on the tool bar or go to FILE, SAVE.Select FILE
Select SAVE AS
Select 3.5 Floppy (A:) in the SAVE IN DROP DOWN BOX
Change the default name if needed
Select Save as an HTML or Text in the SAVE AS TYPE box
Click SAVE - the page will now download to the diskette
)on the tool bar or go to FILE, SAVE.Select FILE
Select SAVE AS
Select 3.5 Floppy (A:) in the SAVE IN DROP DOWN BOX
Change the default name if needed
Select Save as an HTML or Text in the SAVE AS TYPE box
Click SAVE - the page will now download to the diskette
Saving to Desktop There may be a time when you need to save temporarily a file to the desktop. When the file is open: Click on FILE Click on SAVE AS Choose Desktop from the dropdown list Type in a file name in the File name box Click on OK